


Mountains are pretty exciting places. We love hiking out into the middle of nowhere, with a wide open view and the wind in our faces. Think dramatic panorama shot where the hero (that’s you) stands up high, gazing out over the land, hair lightly tousled by the wind. Perfect. Unfortunately the UK’s weather is rarely so obliging in the mountains. Even in “summer” you’re likely to be confronted with horizontal rain. Then it chills down, the rain turns to snow, the mountains turn to icicles and everything gets a bit more serious.
When people talk about “winter” in the mountains, they mean any time that snow’s on the ground. That means you can get winter any time of the year – including March, as the Beast from the East showed us, and occasionally June in the Scottish Highlands. But, typically, winter conditions start kicking off around November and are calming down by March. You can certainly expect snow in the Highlands in those months.
So, rather than just not go hiking for five months, it’s worth learning about how to stay safe in the UK’s mountains in winter. This article should help you prepare for a winter hiking trip because if there’s one thing that’s certain, it’s that winter is coming…
1. Check the Weather
Wait! Don’t keep scrolling down thinking to yourself, “Well, duh…” We’re not talking about whatever your weather app popped up with in the morning. Mountainous areas have their own localised weather systems. That’s true whether you’re talking about the highest mountain in the world or a hill range in Scotland. We could go deep into surface pressure charts and lapse rates but there are basically three key things you need to know.
- The higher up a mountain you go the colder it gets (typically 1°C per 100m ascent)
- If it’s a little windy at the bottom of the mountain it’s probably really windy at the top
- The weather can change very quickly in mountainous areas
Mountain Forecasts
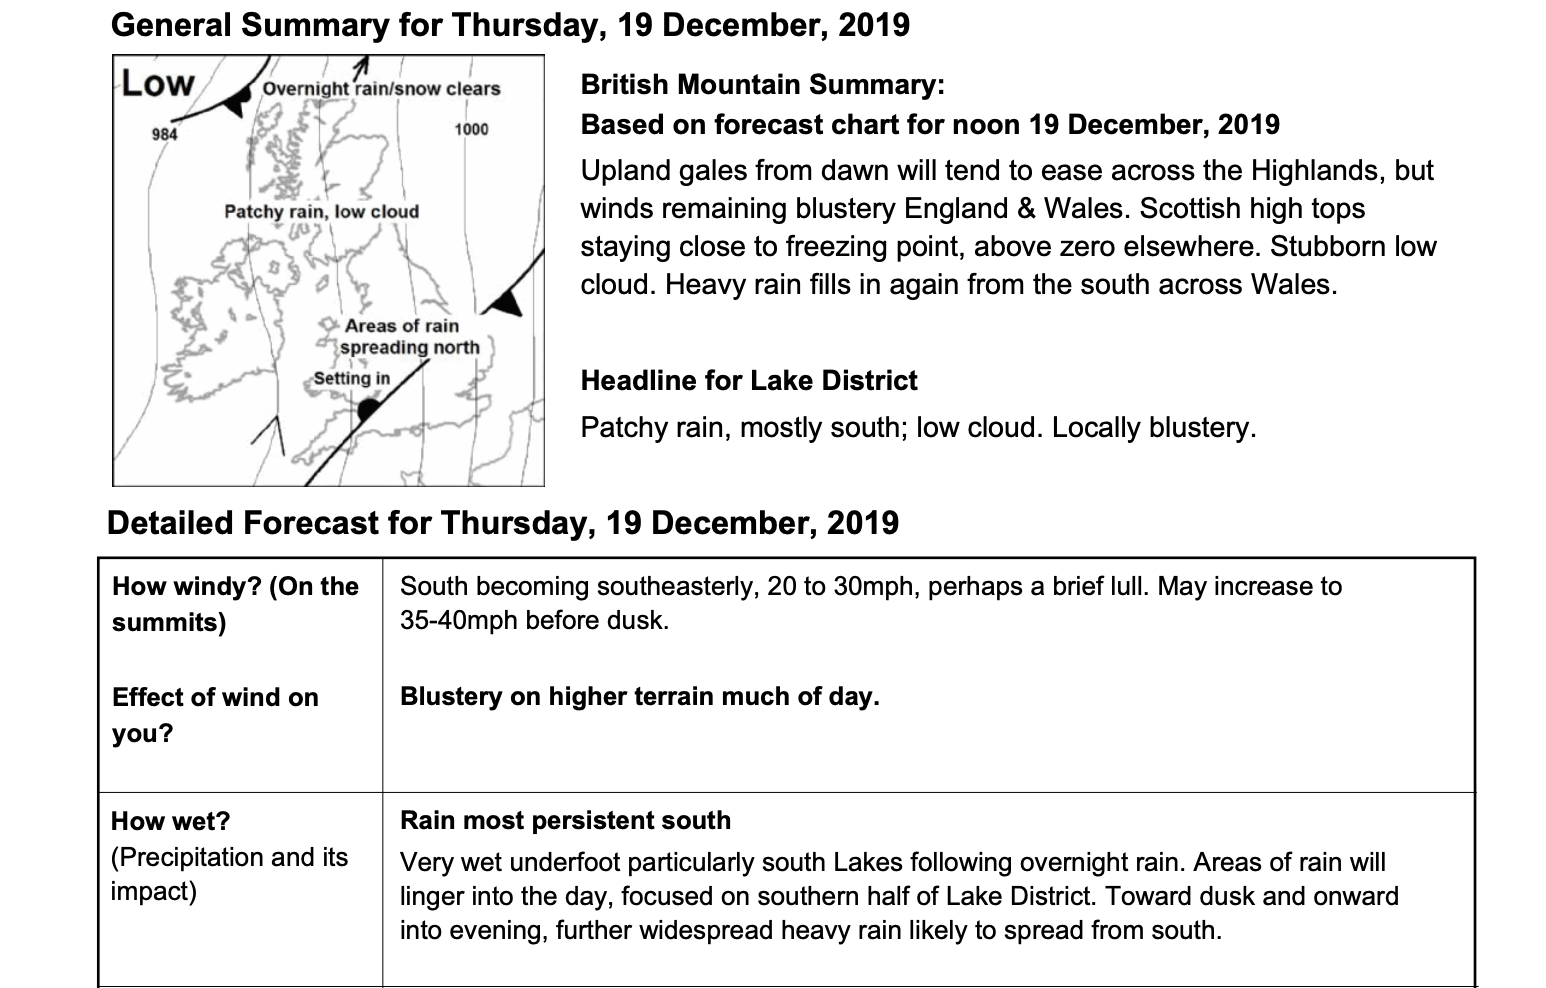
Great, so how do you get a mountain specific forecast? Well there are a few places in the UK. You can check the Met Office and you’ll find there are some forecasts for famous mountains (e.g. Helvellyn, Snowdon). Better still, the Mountain Weather Information Service (known as MWIS, pronounced “em-wiss”) does a detailed and specific forecast for each of the mountain areas of the UK. It will also give you useful context like the effect of the wind on you and the chance of cloud-free summits. They also give a freezing level, which is particularly useful for snowy winter hikes.
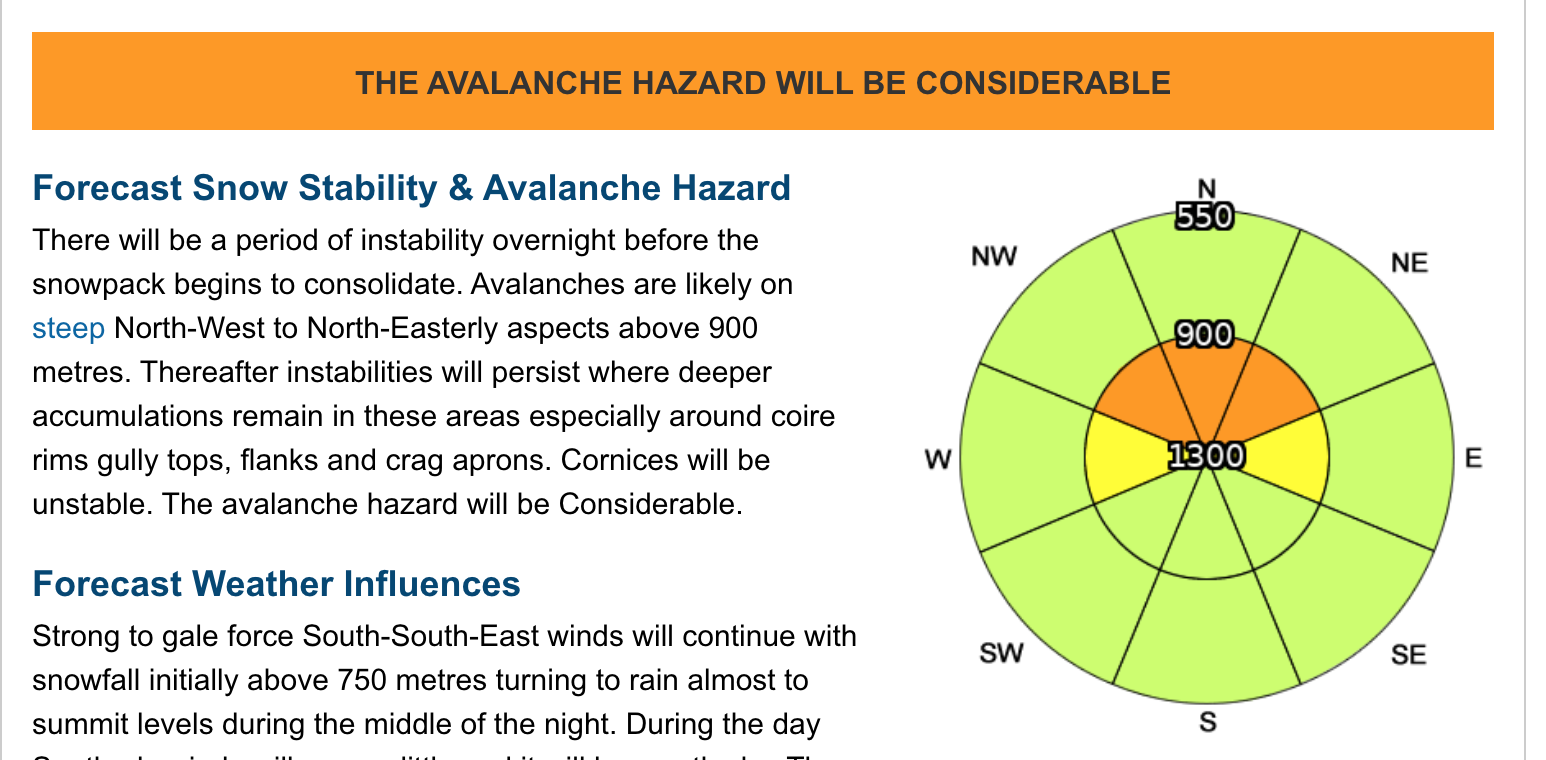
On the subject of snow, if there’s any chance of there being white stuff up on the hills, you should check the Avalanche Forecast. For anything north of the border, the Scottish Avalanche Information Service is your go-to. Just be aware that forecasts only start in December, but that doesn’t mean there’s no avalanche risk if there’s snow in November!
For the Lake District, the Fell Top Assessors do a daily report from Helvellyn, with useful pictures. So yes, it is genuinely someone’s job to climb Helvellyn every day of the year. The Met Office does a mountain weather report for Snowdonia, the Yorkshire Dales, Peak District and other main mountainous areas.
How to Check the Weather
If you’re planning to go hiking, say on the weekend, here is how you’d keep up to date with the weather. Firstly, during the week before, you’d check the general forecast for the area you’re going to. You might also keep an eye on the specific mountain forecasts each day to see what the weather’s actually doing. For example, was there several metres of snow? Did it thaw off? Was there a freeze-thaw cycle? Count this as pre-adventure day-dreaming if you like, getting psyched for your weekend away. The weather where you’re going could be very different to where you are now.
 Dani Redd
The next time to check is the day before your hike. Let’s say you’ve left work on Friday and arrived at your hostel in the mountains. It’s a bit late, but before you go to bed, you want to plan your route for tomorrow. No point wasting time in the morning. Luckily, the MWIS forecast is updated late afternoon each day. So you’ve got the best information for tomorrow’s weather. You’ll read the description and compare it to what you were hoping to do.
Think about things like whether you’ll be walking into the wind all day. Is it so windy that it’s dangerous to be up high and you should plan a lower hike? Pick a route that will allow you to be safe in the snow conditions. Make sure that you are comfortable with the avalanche risk and avoiding walking on or below dangerous slopes.
Finally, you’ve decided on your route and snuggled down into your duvet for the night. Waking up in the morning feeling refreshed, you check the weather again over breakfast if you can. This really depends on how early you’re setting off – the forecast might not have been updated, but it’s worth checking anyway. That way you’re always working with the best information you can get. At this point, you might still completely change your route. You also get to look out the window and size up the weather over your bowl of muesli. Then it’s time to go outside and start hiking, but remember you can always change your plans if the weather turns grim.

2. Be Over-Prepared
Whether “Be Prepared” makes you think of the Scouts, or Jeremy Irons as a revenge-set lion singing at a goose-stepping pack of hyenas, you need to be prepared for hiking in winter. It’s just that extra level of extreme. Part of that preparation is through knowing what the weather’s doing, like we just talked about. Another part is thinking about “escape routes” for your planned hike – basically, if something goes wrong, how else can you get off the mountain? If you’re committing to an A to B ridgeline with no other routes down then the weather’s going to have to be perfect.
The other main way to be prepared is to have the right equipment and to know how to use it. No one wants to have all the gear and no idea. Even a little bit of an idea is better than having the kit, but no clue how to use it. Of course, no one expects you to just know everything about using ice axes and crampons as soon as you buy them. It’s best not to throw yourself in at the deep end – unless, of course, you’re learning winter skills with a mountain guide.
Equipment
Take more equipment with you than you think you’ll use. We’re not saying to pack a three piece suite and a jacuzzi but, for example, if you think you’ll be warm enough in three layers, bring four. Bring a spare pair of warm gloves (even if they’re not very good) for the moment when you drop a glove and the wind blows it off the mountain. The same goes for hats and food and… just bring lots of spares. You never intend to use them and that’s great – but it’ll be even better when they’re there to fall back on.
Kit you might take
This is not necessarily an extensive list, but it should give you a good idea of what a winter walker might take for a day out in the UK’s winter mountains. Of course this depends a lot on conditions and your intended route. Still, to give you an example, here’s what I might wear on an average, dry winter day out as I set out on the hill:
- B2 boots (for more about boot ratings, read our article on crampons)
- Walking trousers
- Merino leggings
- Merino winter baselayer
- Fleece
- Another fleece
- Buff
- Socks
- Gaiters
- Watch
Then I would have a rucksack of at least 35 litre capacity, often up to 50 litres, on my back. Inside the rucksack, I would at least have:
- Map and compass (ideally in your pocket, not buried at the bottom of your bag!)
- Hat + spare
- Liner gloves
- Warm outer gloves + spare
- Waterproof jacket
- Waterproof trousers
- Belay jacket or other very warm insulation layer
- Snow goggles
- Sun glasses
- Spare buff
- C2 crampons
- Ice axe
- Head torch
- Storm shelter / survival shelter / KISU (for emergencies or occasionally for eating lunch in)
- Food – lunch plus snackage
- Water – at least 1 litre
- Whistle (for attracting help in emergencies)
- First aid kit
On top of that, I might also take some extra bits and pieces to make the hike more enjoyable. Consider this as you vs the weather and the cold. Those little luxuries help.
- Emergency Jelly Babies (other brands are available!)
- Hot flask of tea etc
- Spare food (you never know…)
There will be other bits and pieces you might add or swap out, depending on personal preferences. But that’s if you stopped a competent-looking person somewhere on top of a mountain in winter, you’d probably find all that list on them. Please do not go accosting random people to empty their rucksacks inside the summit shelter on Helvellyn, even if you pretend you’re doing a survey. Just trust us on this one!
3. Stay Safe
In winter, if things go wrong, they can go wrong very quickly. Usually, it’ll be a combination of tiny bad decisions that snowball into a serious emergency. Not to try put you off, but snow and ice provide far more ways for you to get injured than in summer. You’ll build up your skills and experience slowly, or get a jump start with a guide. Here are some tips to keep you on track.
Remember you’re in control
Unless you’ve been trained to lead groups in the mountains, make sure everyone in your group is 100% happy with the conditions and the way your day is unfolding. If you’re saying, “Aw, it’ll be alright!” then it probably isn’t. Equally, if you’re not happy with something, definitely say it to your group – you’d be surprised how other people start to admit they’re uneasy too once someone else has. This is not Sparta and it’s better to finish the day alive than summit that peak.

Take a look at what other people around you (if there are any) have come equipped with. This isn’t always a good indicator, particularly on very busy peaks, but if everyone else has walked past you in full ice axe, crampons and snow goggles there’s a good chance that’s what you should be wearing too. If you don’t have them, it might be time to turn back or change the route.
The other thing to remember is that you are always in control. It is incredibly unlikely that you have to complete your route in order to save the planet from destruction or summit a peak to vanquish the forces of evil. No one is forcing you to complete this task: you are the one pushing forwards and you are the one who can chose when to stop. Sounds obvious, but easy to forget when you’re battling a snowstorm.
4. Learn Winter Navigation Skills
Winter navigation is an enormous topic and we have no intention of trying to cover it all here. It goes without saying: if everything is deep in snow, it becomes a lot harder to know where you are. Particularly if the cloud come in and all you can see in any direction is white.
Rather than try to give you a primer in winter navigation, here are a few things you should really know to stay safe:
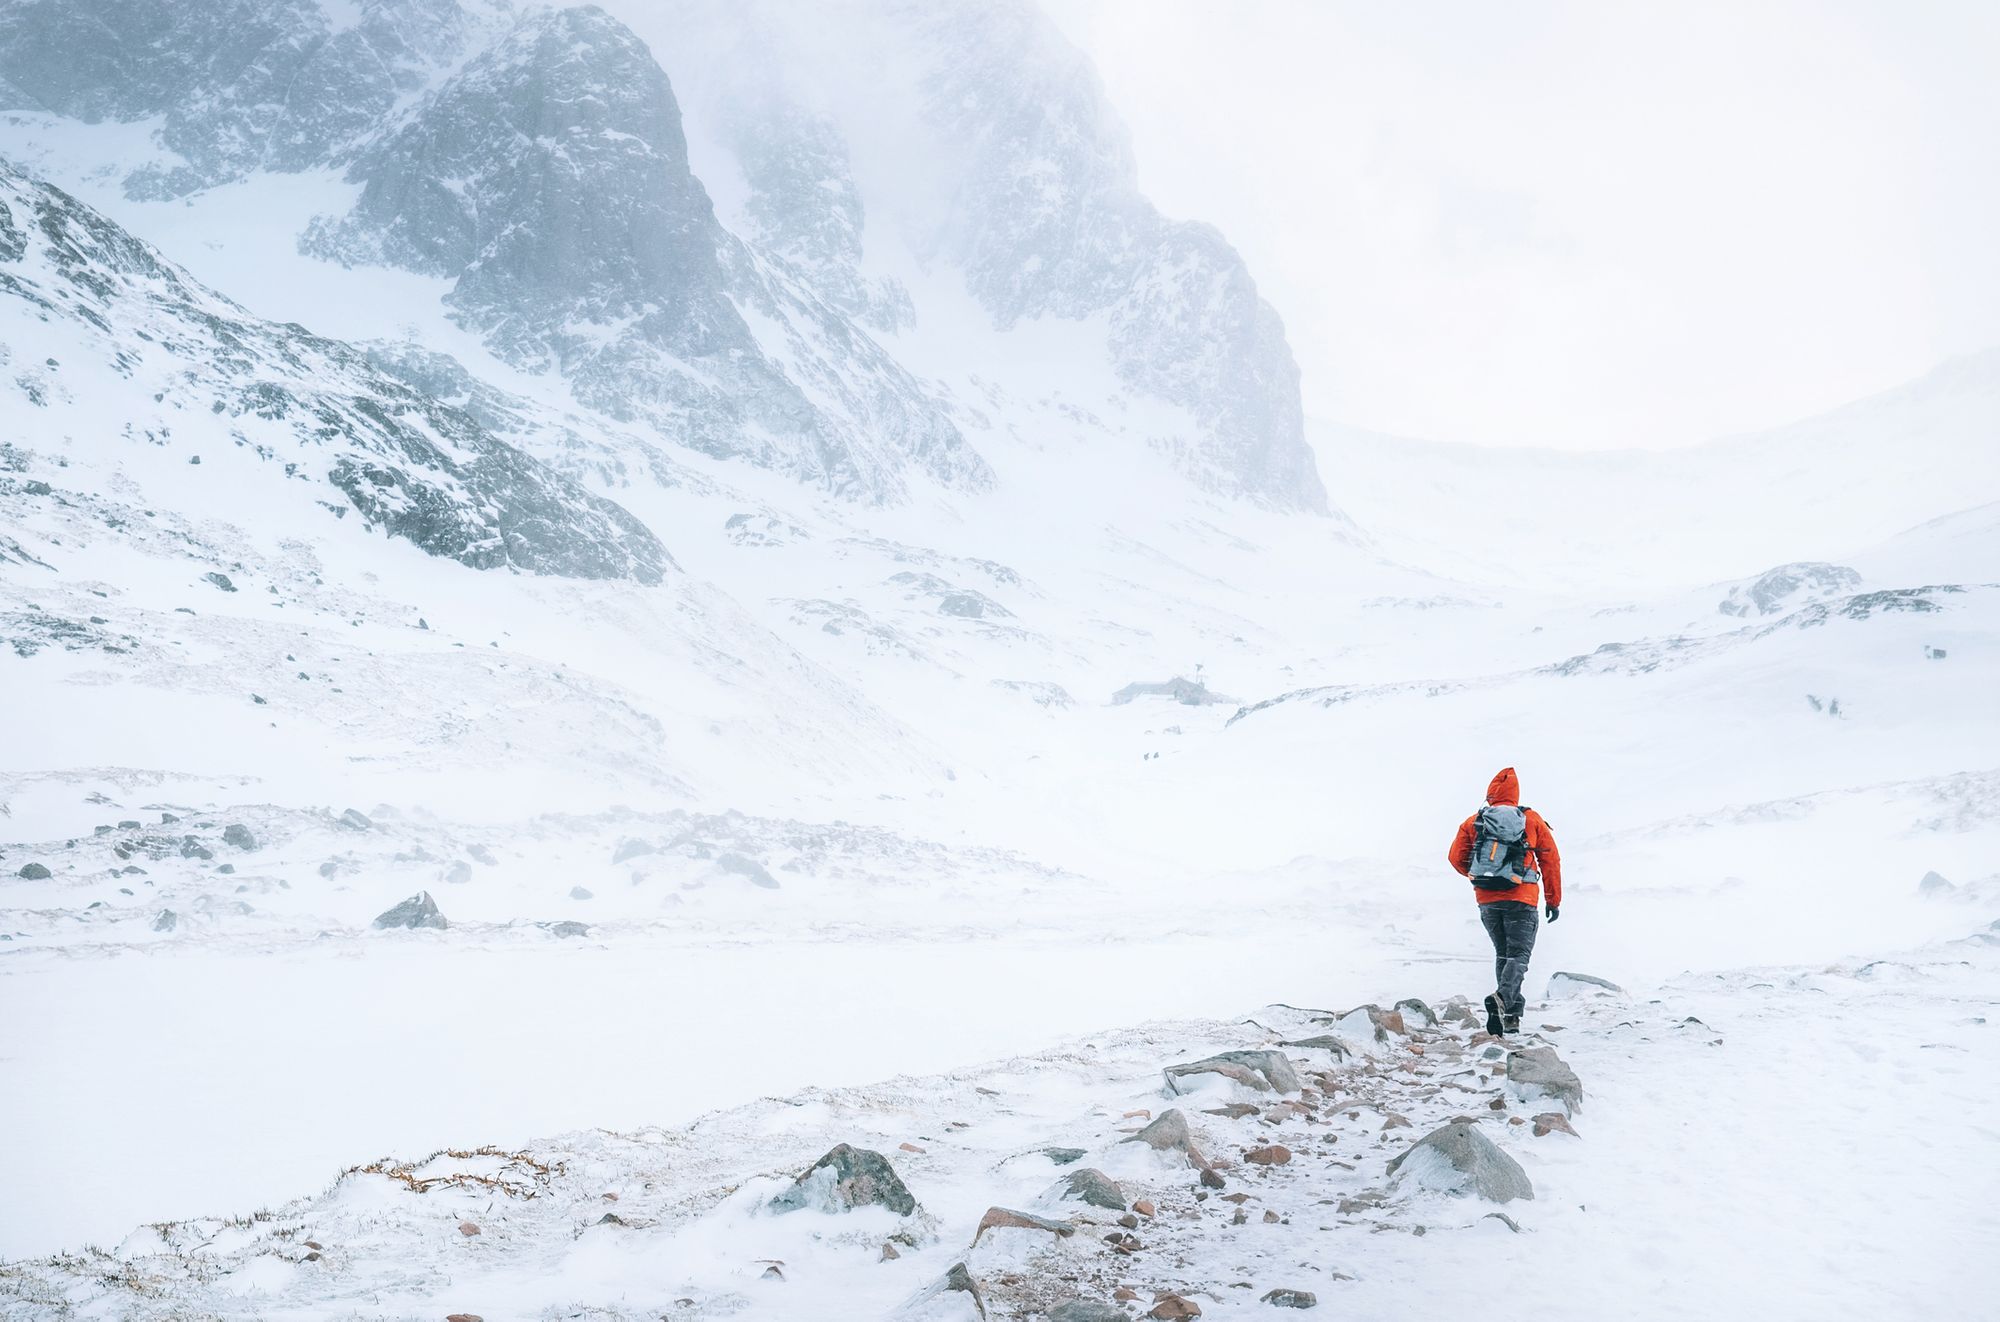
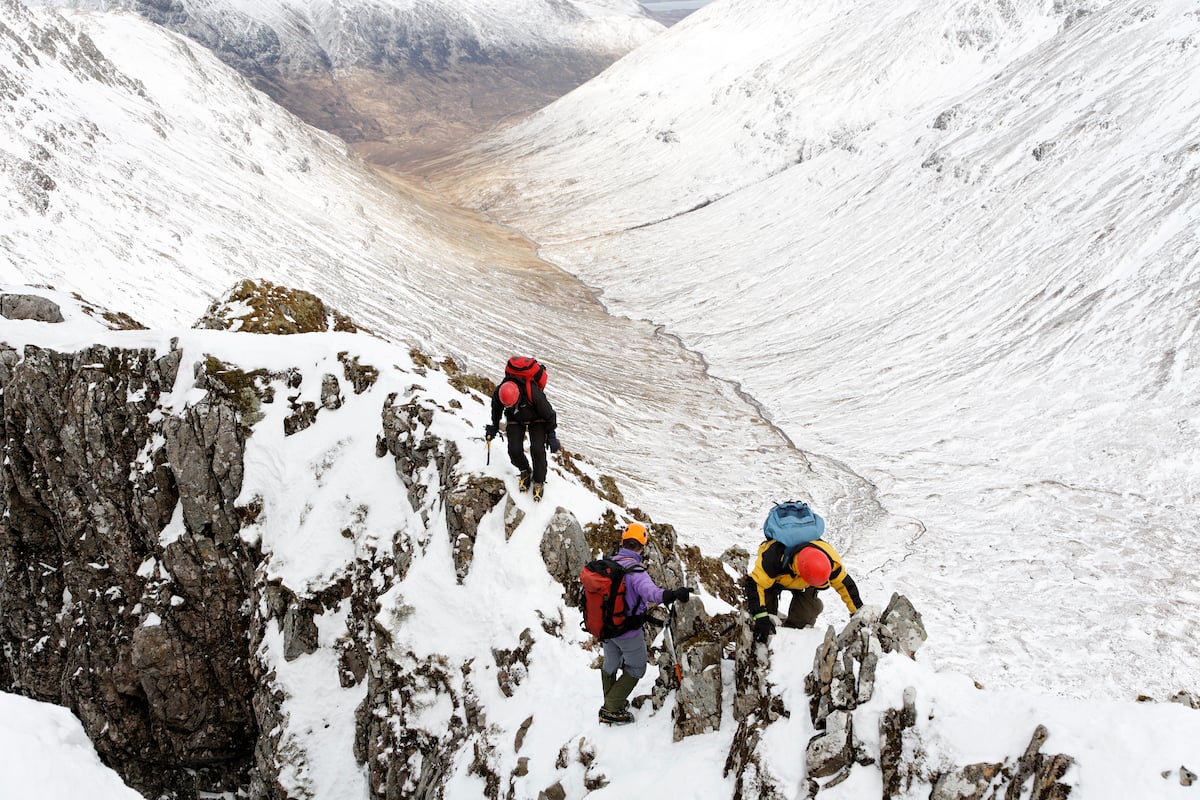
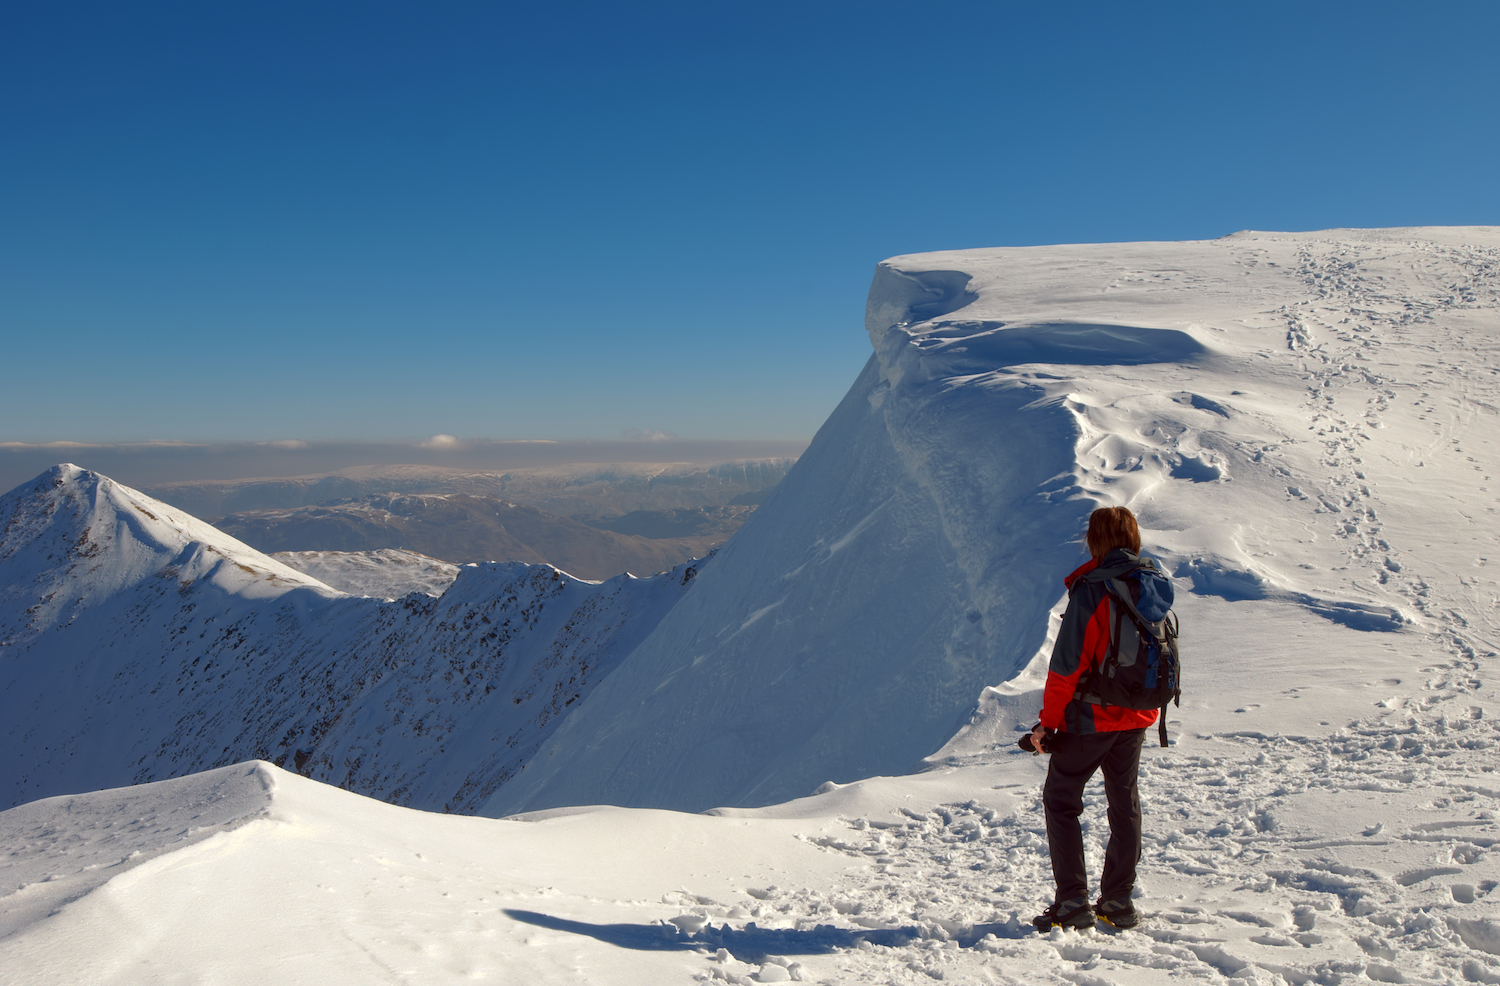
- Don’t stand too close to the edges of ridgelines. Snow builds up along the edges and if becomes hard to tell when you’ve got ground beneath your feet and when it’s just snow! In the picture above, the snowy crest in front of and left of the person is all snow. Standing near the edge of the crest could cause it to collapse underneath you. Not good.
- Along a similar line, please don’t blindly follow a GPS off the edge of a cornice (snow crest like above). The most direct route is not always the best in winter – it pays to be cautious.
- Moving in winter conditions takes a lot longer than normal. Allow plenty of time for your hike, compared to the distance you’d normally knock off in the summer.
5. Call Mountain Rescue in Emergencies
If you’ve got this far and taken on board all of the advice in this article, then remember that emergency situations still can happen. Of course, we all hope they don’t, but there’s risk involved in any outdoor activity. You mitigate as much as you can, but at some point things might just go wrong.
Luckily there are wonderful, volunteer Mountain Rescue groups around the country who will drop everything and leave their work, dinner, wedding anniversaries and children’s birthday parties to come and help you out. They exist to find and recover people in remote mountainous locations where the police, ambulance and fire service would struggle to get. Although they’ll always respond when they’re needed, they will not be best pleased if you’ve climbed Snowdon in deep snow wearing Ugg boots and want a lift back down.
To get assistance in an emergency (in the UK’s mountains), call 999 and ask for the Police, then Mountain Rescue. Give as much information to the operator as possible. Although an exact Grid Reference is nice, a description of where you’ve been and were intending to go is just as useful. Tell them when you last knew where you were if you’re lost and what you’ve done since then. If you have an injury, give them a best description as you can of the symptoms and what happened. They’ll be with you as soon as they can.
Inspired to learn more? Check out our Summit Ben Nevis and Learn Winter Skills course, and our other Sub Zero Adventures.